If you think that come SHTF you are gonna jock up in all your kit and be a death-dealing one man army, you're an idiot - izzyscout
Stig I'll throw a couple of things I screwed up 1st hand. Being close to the house really limits your options a huge amount. Examine really closely all the limbs on the tree. How large are they, which direction do they go, Is there a twist in the trunk, is there a multi branch trunk? Take all these thigs into consideration. They can all affect the direction the tree will fall. You can notch the tree to aid in this regard, but it will not be the only thing to affect the drop.
Also make sure your cutting on a windless day, or at least use the wind coming from the direction to aid you in dropping the tree.
I was helping my stepdad and BIL cut some trees at the BIL's house. We had cut 4 trees already and had cut them up and removed the brush. So we were getting tired, and we started on the 5th tree. It was not very windy, maybe 5-7mph, but it was blowing thru the tree toward the house. The limbs on the tree were spread around, but it had one heavy limb closest to the ground, but agin pointing toward the house. We notched the tree and started cutting the back side and with less than 1/4 of the tree left to cut, got hit with a gust of wind, maybe 15mph or so. It pushed the tree back and pinched the saw on the stump very firmly and sounded like the fibers were breaking. At this point there wasn't much we could do except pray for no more wind gust till we could figure it out. Long story short, I had a 150' rope in my truck and we put a ladder up the tree and wrapped the rope back and forth between the truck and tree and was able to pull it away from the saw enough to get it out and finished cutting the tree down. It scared the crap out of me.


From experience dont skimp on the bar oil. It is VERY easy to destroy a chain if a sub par or improper oil is used in your machine. Use what is recommended by the manufacturer on such a important tool as a chainsaw. Companies spend lots on R&D to figure out what will and wont work. Take their word on it.

I would like to add something I dont think I saw.
Something I learned in managing a small engine repair place. Carbs. You can get a whole carb assembly for around 100 bucks usually. I would suggest buy a spare one along with couple repair kits, be it a diaphram or float carb.
If you were ever under the gun dealing with downed trees from like a EQ or landslide you dont wanna screw with rebuilding one right then and there.. Obviously having a back up saw is even better.
Also a lot of places employ a younger kid to resharpen chain saw blades and then the store resells them at a discount. 7-8 bucks beats 20 any day of the week.
Just my $0.02 worth
Aweaome thread


Sorry for the long wait, I was waiting for some snow to melt, so I could dump some trees on my neighbor's property. Real easy trees to work with and photograph the process.
Firstly, when you pick the tree you wish to fall, it is best to identify the natural aspect of the tree and any potential hazards, with the tree or the surrounding. area.
For the natural aspect, you want to know what the natural lean is and the limb weight of the crown or top of the tree. These elements will determine the direction that the tree naturally want to fall. With coniferous trees, limbs will tend to grow on the side that receive sunlight the most, thereby leaving the opposite side of the tree somewhat barren, lower from the top you get.
In the following picture the target tree is dead center. Notice how the limbs are fuller and more developed on the left side (downhill) than the right, or uphill side. That is your limb weight. In the case of this tree, it will have no bearing as I intend to fall the tree downhill. At times I've had limbs on the opposite side of the tree, and contrary to the direction I wished to fall. Such an instance can be countered with the use of wedges, but be careful, the limb weight will sometimes cause the tree to spin on the stump as it is falling possibly endangering yourself.
As a rule of thumb, never try to fall a tree more than 45 degrees off from its natural lean.
As you approach the tree, you are going to look for potential hazards. First, look up into the top for widow makers, branches that may fall down on your head while cutting. Look for other trees leaning into your target tree. You need to remove those before you fall your target tree. Look at your intended falling direction for trees that will hinder the fall of your tree, or for loose branches in those trees. If your tree hits or glances off another tree, depending on the top of that tree, it will bend with your faller, but spring back like a sling shot, flinging loose material, or even the entire top back at you.
Next look at the intended fall path of your tree. Any dead logs on the ground may either be flung up like a teeter-totter, or cause your tree to bounce. Both situations are bad news for you. It's best to have you fall path clear of obstructions to facilitate smooth, soft landing.
Next check your target tree for anomalies such as frost cracks, lighting stripes, animal burrow holes, and hollowness. Each of these aspects could have a negative effect on how the tree responds while cutting it, possibly causing loss of life. To sound for hollowness, just whack the tree with a hatchet above, below, and at your intended cutting section. You will be able to tell when a tree is hollow in the core. If it is, skip it, and find another.
After all these safety precautions are taken, you can now engage in the falling process.


On to the actual falling.
You've pick out the safest direction of falling, so it is time to make your first cut.
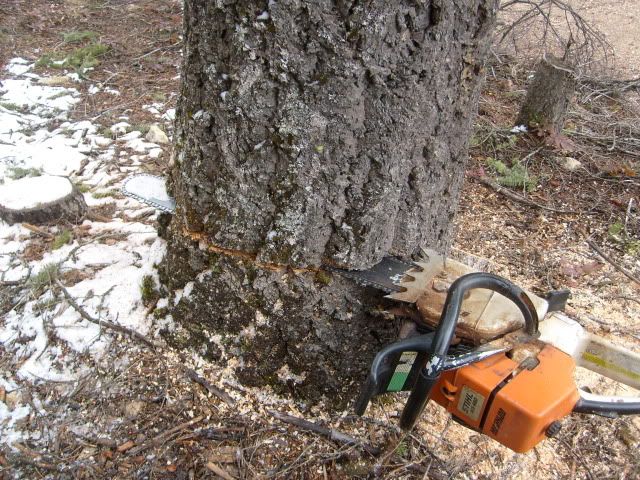
Starting on the side that you intend the tree to fall, make a horizontal cut into the tree no more than 1/3 the diameter of the thickness of the tree. Stand naturally where the power-head of the saw is at waist level.
An easy way to know that your saw is cutting in the right direction of intended fall, is to look at the straight line of the molding just to the left of the pull-start handle. That line will tell you exactly how your beginning cut is pointing.
Next you are going to complete your wedge cut but cutting a connecting cut about 30 degrees either above or below your initial cut. I suggest to novices to do so above which I will show why later.
Now you cut out your hinge, or pie slice for the intended direction of fall.
Now we are ready to perform the back cut on the opposite side of the tree. As you are performing this function, be mindful of the tree, glance up at the top from time to time to see if the tree is beginning to fall. Make sure you have an escape route to the rear, 45 degrees either side, oblique from the rear of the tree. About 15-20 feet is good. Behind another tree is even better.
Now don't go full throttle on the back cut, you want to feather the throttle so you can observe the behavior of the tree, listen for telltale cracking, or to put a wedge in the kerf of your cut.
Wedging does two things. It prevents your chainsaw bar from being pinched if you judged the lean incorrectly, and coaxes the tree to fall in the direction you intend it to fall. Don't whack the wedge in there, but with only the force of your palm to seat it. As you keep feathering into the cut, bang the wedge in a little further with the back of a hatchet or hammer. Not to much though, you don't want to cut the tip of the wedge with your chainsaw.
When you can see the top of the tree moving, and hear cracking, its time to pull your saw out, and back away at a 45 degree angle. Never turn your back on a falling tree. If your saw won't come out.....LEAVE IT. A saw can be replaced, you can't.


Your tree is down safely, congratulations.
Let's look at what happened to our cut.
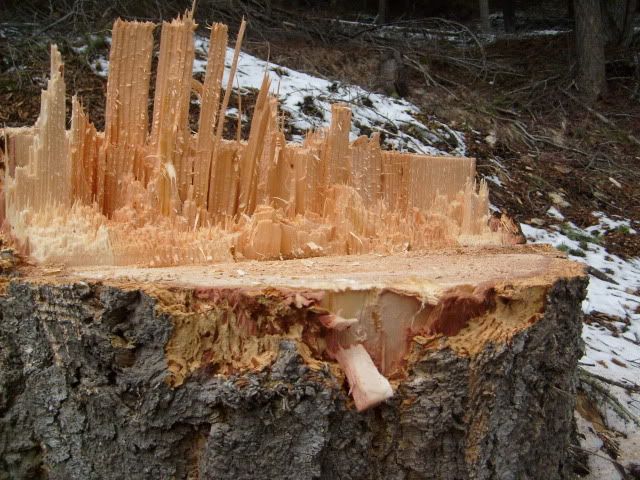
The space between your front hinge cut and that of your back cut is called the stump shot. You can see where the body pulls away from the stump through the forces of leverage, gravity, and inertia.
If you have to cut all the way through.........you're doing it wrong.
Basically when you are falling a tree, you are weakening its structure, and then letting nature do the work.
Now remember I said you can either make your secondary wedge cut on the face (front) either above or below your initial cut? This is why cutting above is a bit safer. So you have your face cut all done and are preparing to start your back cut. On your back cut, start to cut about an inch or two above the height of your initial face cut line.
In doing so, you create a block that prevents the tree from slipping off the stump backwards into you. Sometimes they do that, but cutting your back cut an inch or two higher than the front impedes such, and causes the tree to "jump" off the stump, directing all that energy towards the intended direction of fall. I've seen trees jump 20 ft before the butt hit the ground. Without such technique, the falling tree could slide back dozens of feet towards you and your safety zone.
This picture shows the stump, looking it at the front towards the back. Notice how the back cut is a couple inches higher than the front. This technique could save your life from a rogue tree.

Great thread and extremely useful info. Thanks Chicom.
We just may have to change this thread's title. It is so extensive that it is no longer a primer.
Very good job!!
This is fantastic information.
Gentleman (and any ladies that may have slipped in when I wasn't looking), this is what a kickass prepping thread looks like.
If you think that come SHTF you are gonna jock up in all your kit and be a death-dealing one man army, you're an idiot - izzyscout
Bookmarks